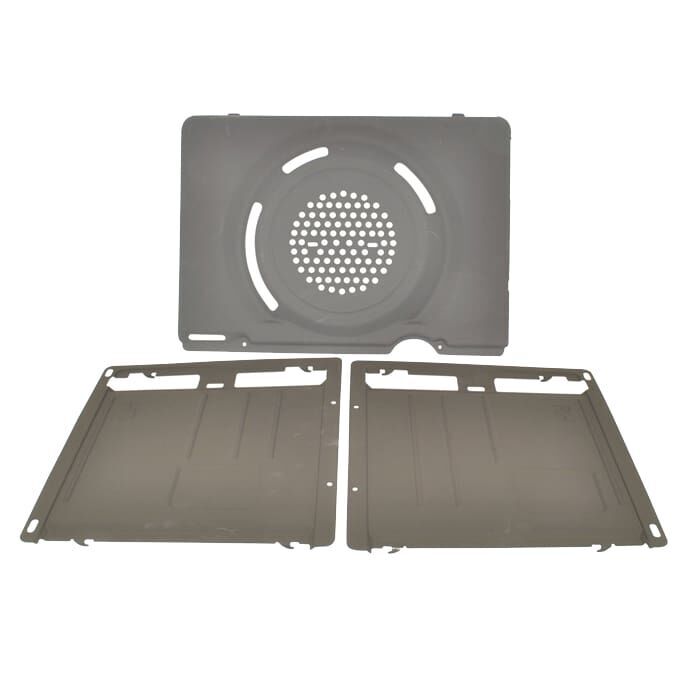
Electrolux Optional Side and Rear Catalytic Liners for Electric Ovens - ACC041
Brand: ELECTROLUX | Part No: ACC041
SKU: SVE_0003920
DESCRIPTION
This replacement is compatible with ELECTROLUX Ovens & Stoves.
Ricambi Appliance Spares is a family-owned business based in Sydney, NSW, with strong industry roots. We specialize in sourcing genuine, OEM, and high-quality appliance parts from around the world, including compressors, to serve the Australian market. Our expertise focuses on Italian and German brands, along with a wide range of compressors from global manufacturers.
TECHNICAL SPECS
Title: Electrolux Optional Side and Rear Catalytic Liners for Electric Ovens - ACC041
Brand: Electrolux
Part Number: ACC041
Suitable For: Oven
Compatible Brands: Electrolux
Notes:
DIMENSION AND INSTALLATION GUIDE
Suitable for Built in and Freestanding Ovens catalytic self clean liner kit
IMPORTANT – Ensure that your oven is turned off before proceeding. Before the catalytic liners can be installed the wire shelves and side racks need to be removed. Suitable for Built-in and Freestanding Ovens Removing the Side Racks (shelf supports) IMPORTANT – Ensure that your oven is turned off before proceeding. Grasp the shelf supports at the front. Pull them firmly inwards. Before the catalytic liners can be installed the wire shelves and side racks need to be removed. CATALYTIC SELF CLEAN LINER KIT Installing the Catalytic Liners Removing the Side Racks (shelf supports) • Grasp the shelf supports at the front. • Pull them firmly inwards. Suitable for Built in and Freestanding Ovens The catalytic liners will attach to each side of your oven. There will be a left hand and right hand side version. Position the first liner as per the diagram. The black, shiny side of the liner should be facing the oven wall, the hooks pointing down and the front edge will have a narrow strip before the vertical slot (when compared to the strip at the rear edge).Note that the diagram shows the left hand liner. The right hand side will be a mirror image of this. IMPORTANT – Ensure that your oven is turned off before proceeding. Before the catalytic liners can be installed the wire shelves and side racks need to be removed. Installing the Catalytic Liners Line the hooks up with the slots provided in the oven wall, push them in and then allow the liner to slide down to final position. The access hole for the side racks should be visible-see diagram. • The catalytic liners will attach to each side of your oven. There will be a left hand and right hand side version. Removing the Side Racks (shelf supports) • Grasp the shelf supports at the front. Inserting the Side Racks (shelf supports) • Position the first liner as per the diagram. The black, shiny side of the liner should be facing the oven wall, the hooks pointing down and the front edge will have a narrow strip before the vertical slot (when compared to the strip at the rear edge). Note that the diagram shows the left hand liner. The right hand side will be a mirror image of this. • Pull them firmly inwards. Insert the largest peg into rear access hole provided. Then locate the front peg into the front access hole and push firmly. The rack will snap into place. Installing the Catalytic Liners • Line the hooks up with the slots provided in the oven wall, push them in and then allow the liner to slide down to f inal position. The access hole for the side racks should be visible – see diagram. • The catalytic liners will attach to each side of your oven. There will be a left hand and right hand side version. • Position the first liner as per the diagram. The black, shiny side of the liner should be facing the oven wall, the hooks pointing down and the front edge will have a narrow strip before the vertical slot (when compared to the strip at the rear edge).Note that the the left hand liner. The right hand side will be a mirror image of this. • Line the hooks up with the slots provided in the oven wall, push them in and then allow the liner to slide down to final posi hole for the side racks should be visible-see diagram. Inserting the Side Racks (shelf supports) • Insert the largest peg into rear access hole provided. • Then locate the front peg into the front access hole and push firmly. The rack will snap into place. Inserting the Side Racks (shelf supports) Removing and replacing the Catalytic Fan Baffle • Insert the largest peg into rear access hole provided. Remove the 2 retaining screws on the top edge of the fan baffle. • Then locate the front peg into the front access hole and push firmly. The rack will snap into place. Pull the top edge towards you and then disengage to bottom tabs from the oven back. NOTE: The fan baffle must be replaced after cleaning. Removing and replacing the Catalytic Fan Baffle • Remove the 2 retaining screws on the top edge of the fan baffle. Insert the two tabs at the bottom of the fan baffle into their corresponding slots in the oven back. Push the top home and insert screws firmly into appropriate holes. The fan baffle must not be loose. • Pull the top edge towards you and then disengage to bottom tabs from the oven back. • NOTE: The fan baffle must be replaced after cleaning. Removing and replacing the Catalytic Fan Baffle • Remove the 2 retaining screws on the top edge of the fan baffle. • Insert the two tabs at the bottom of the fan baffle into their corresponding slots in the oven back. • Pull the top edge towards you and then disengage to bottom tabs from the oven back. • Push the top home and insert screws firmly into appropriate holes. • NOTE: The fan baffle must be replaced after cleaning. • The fan baffle must not be loose. Operation • Insert the two tabs at the bottom of the fan baffle into their corresponding slots in the oven back. • Push the top home and insert screws firmly into appropriate holes. • The fan baffle must not be loose. Catalytic self clean panels are coated with a specially formulated enamel coating, over a base of regular enamel. This enamel coating has a rough surface which is also porous.
During normal cooking, fats and other food spatter is partially absorbed into the surface and then oxidises away. This oxidisation of the fat works best if the oven is set at high temperatures. You will find that if they do a lot of lower temperature baking, say around the normal 180ºC, then the cleaning process may not be complete. Every now and then you should turn the oven on to 260ºC for around one hour to completely remove the soil. Operation Cleaning Catalytic self clean panels are coated with a specially formulated enamel coating, over a base of regular enamel. This enamel coating has a rough surface which is also porous. During normal cooking, fats and other food spatter is partially absorbed into the surface and then oxidises away.
This oxidisation of the fat works best if the oven is set at high temperatures. You will find that if they do a lot of lower temperature baking, say around the normal 180ºC, then the cleaning process may not be complete. Every now and then you should turn the oven on to 260ºC for around one hour to completely remove the soil. Operation Cleaning Should the panels become heavily soiled, they will need to be taken out of the oven and cleaned by hand. They should be soaked in warm, soapy water for at least 2 hours and then wiped clean with a soft cloth. Solid cleaning powders, creamy cleansers, caustic oven cleaners, steel wool or other scourers will ruin the catalytic surface and must NEVER BE USED. Should the panels become heavily soiled, they will need to be taken out of the oven and cleaned by hand. They should be soaked in warm, py water for at least 2 hours and then wiped clean with a soft cloth. Solid cleaning powders, creamy cleansers, caustic oven cleaners, steel wool or other scourers will ruin the catalytic surface and must NEVER BE USED.
Catalytic self clean panels are coated with a specially formulated enamel coating, over a base of regular enamel. This enamel rough surface which is also porous. During normal cooking, fats and other food spatter is partially absorbed into th away. This oxidisation of the fat works best if the oven is set at high temperatures. You will find that if they do a lot of baking, say around the normal 180ºC, then the cleaning process may not be complete. Every now and then you should turn the oven on to 260ºC for around one hour to completely remove the soil.
IMPORTANT This is a guide of product dimensions only. For complete installation instructions, refer to the manual provided with product.
Suits:
PGR657S, PGR657W, PGR659S, PGR659W, WVE916SA
Ricambi Appliance Spares is not liable for any damage resulting from incorrect selection or improper installation of spare parts.
All electrical components must be installed by a qualified electrician, and all technical products should be installed by a professional technician.
PCB returns will not be accepted once theseal is broken.
Errors and Omissions Disclaimer:
While we strive to ensure all information on this website is accurate and genuine, Ricambi accepts no responsibility for its use or for any potential infringements of patents or third-party rights that may occur.
Legal Disclaimer:
All trademarks, logos, and other representations are the property of their respective owners. The use of brand names, trademarks, or logos does not implythat RICAMBI is affiliated with or authorized by those brands, companies, or trademark holders.
RICAMBI does not claim ownership of any products or services provided by these companies.
SPECIFICATIONS
| SKU | SVE_0003920 |
|---|---|
| Brand | Electrolux |
| Shipping Weight | 1.0000kg |